Monday, December 5, 2011

My first tag and charm combo

I just started getting into making the dangle charms. They have become somewhat of an addiction for me. I love making them. I have never made the tag/card that a lot of other crafters make to go along with the charm. This is my first attempt at the tag process and I have to say that I like the way it turned out.


I started with a plain large tag in an off white color.


I then inked the tag with 3 different Tim Holtz distress inks. After I had inked to my liking I stamped with some flourishes, a fairy and the word Magic...all of these stamps were Michael's brand recollection stamps from different sets.


I then sprayed the tag with glimmer mist. as you can see it made the stamp images "run" a little. So maybe next time I will spray with the glimmer mist before I stamp with an image. I must admit though, I like the "run" effect that it made on this tag. 


I added my charm to the tag with some strands of ribbon and you have the finished product! I hope you enjoyed looking at my project today. I hope to be back real soon with some more projects to share with you. 

Monday, October 31, 2011

Altering those mini comp books...just the right size to put in your purse!

I recently participated in a color combo swap on the cricut message boards. The ladies there are just wonderful and so fun to swap with. I had Rhonda (Heart2Hand on the message boards) as a partner. The colors for October were Chocolate brown and blue. The rules are to purchase at least $20 worth of scrappin' items for your partner and then there is a twist to the rules. The twist this month was to make an item for your partner. I decided to make two items....the box I posted about a while back and this book.

I covered the book with a single sheet (trimmed down to size) of blue and white paper. The paper kind of had a distressed look already. After I attached it I ink the edges in brown and heavly inked the binding of the book (forgot to take a picture of the binding). The front was stamped with a decorative edge for the top and bottom and lined. I cut the R from Happy Hauntings cartridge (I love that cartridge). I added a Tim Holtz Button to create a "knob" that the thread tie could wrap around to hold the book shut.

The inside covers were done the same way the outside was. Covered with blue and white paper then inked with brown. The back inside cover I stamped with my personalized stamp (from Paperangel.com)...I love it!


The back cover was kept simple to...didn't want to add to much bulk to the book because I wanted it to be able to fit in her purse and write on it with no issues. 


Thank you for stopping by and I'm off to create the next thing to share with you. 

Tuesday, October 25, 2011

All those cartridge boxes and nothing to do with them....or is there?

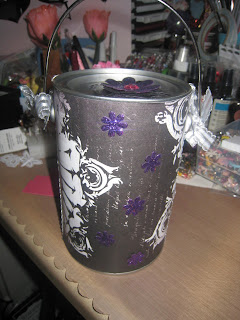
I have so many cartridge boxes that take up so much space and they are just storing the look book and the key pad overlay. All of my cartridges are in a cgull tote. So it was time to do something with those boxes...I needed to downsize and create space for other things. One by one I think I'm going to alter them and send them as gifts to people. The lucky person that gets one can store whatever they wish in them. I have found they are good for small embellies, pens and/or markers, flowers....kids can use them for their stuff as well....my son needs one for his money. Here are a few that I have done already: 


Thank you for stopping by today. I hope to be back soon with more crafty items to share with you. 

Monday, October 17, 2011

Planner/Scrapbook

I was in an all handmade swap recently on the cricut message boards. The lady I was creating for (Sherrie..nice gal) wanted a planner. No problem I've made my own planners before...but I wanted to do something different. Something she wasn't just going to toss at the end of the year which happens to a lot of planners. I wanted to create a dual purpose planner. A planner to start turned scrapbook when the year is over. Below is the cover of the planner. I'm not the greatest when it comes to making vintage looking items but the cover looks good.

Each month had a tab divider. On each divider page I created a little layout. Sherrie can add pictures as she goes. I did a page for each month leaving the tabs for November and December open for her to design. Below are a few of the pages that I designed in the book 


Thank you for stopping by and checking my blog out. I'm trying to get better at this posting thing. I will have tomorrow.

Wednesday, August 24, 2011

1000 paper giveaway


Ok...it's not me I confess but this awesome lady is giving away awesome stuff on her blog. Do you ever get stuck in a creative rut and look for ideas/inspiration. I like to do google searches and I happened to come across this blog. Check out her giveaway. The link is below.

http://www.creationswithkathryn.com/2011/08/1000-sheets-for-thousand-sheets.html

Thursday, August 18, 2011

My first handmade flower

Just a short post today. I'm trying my hand at the handmade flowers. I bought the art philosophy cricut cartridge (exclusive to CTMH) but before I tried those flowers I wanted to give it a go with just layering the petals you can get on a number of cartridges. I have to give credit where credit is due. While trying to figure out how I was going to do this handmade flower stuff I "googled" handmade paper flowers and came across a wonderful blog. Simply paper is ran by an amazing woman who is also very kind in sharing her "how to" tutorials. She has many tutorials showing how to make many different types of flowers.

This is my attempt at what she calls a sweet rose. It's not as good as hers but I think for a first try they turned out nice.

Here is the link for this specific rose tutorial http://simplypaperandcreativity.blogspot.com/2010/09/sweet-rose-tutorial.html but be sure to check out the rest of the things that this lady can do.

Wednesday, August 3, 2011

A card for a new friend......

Today's post is in conjunction with yesterdays post. It's about the same wonderful gal from the same wonderful cricut message boards. That's the great thing about the message boards. You meet new people and build friendships that could last a long time.

In the swap that I'm in the leader (awesome lady Heart2Hand) gives us 20 days worth of words (a different word/phrase for each day). One of the days stated that we had to make a handmade centerstep card. Now I'm not a card "maker" by any means but I do admit it as caught my eye. I like learning new things and I LOVE all things handmade. So, needless to say I'm a scrapper with a card making ability now...lol.

For my first centerstep card ever I have to say I'm pretty proud of myself. Now I recycled the stamp image that is in the center of the card. I'm all about re-using when I can to do my part to help keep the world we live in as clean. I'm trying to do my part to "be green"!


I apologize for the terrible glare....my camera was not working with me. My partner is again...very found of brown but she did mention that she like the combo of brown and silver together. I had plain white flowers that I inked with a little brown and put a white brad in the center of each flower. I look at it now and think that it's too simple but I didn't want to add too much and make it look strange with all the elements. I hope my partner (CricutJunky) likes her card. 


The side view is really terrible...the glare is just awful. I just posted it to show the details of the "centerstep" design. I like this design and plan to start making my own cards instead of buying them. I'll work on my method...polish up my designing techniques and I should have really good cards to show (eventually). Well...I hope you enjoyed the post today and I hope to be back soon with more posts.

Tuesday, August 2, 2011

A shoebox re-designed

I'm currently in a swap on the cricut.com message boards. I'm telling you, I'm so addicted to those things. They are so much fun and a great way to get to know someone. My partner (message board name CricutJunky) is an awesome lady. She loves brown and she is just starting out in the scrapbooking world so she was so easy to put together a box for. I like the freedom of being able to help build their "tool" stock but I'm nervous because I tend to send things that I like using versus what they might like to use. She states she will be happy with anything and she did give me direction on some things she believes she will like to try....hope I followed her directions well enough.


Anywho....here is the "shoebox" that I re-designed for her. She loves the color brown and likes most of the other colors (only exception would be black...she doesn't like black). I stayed away from black and kept the base (the major color in the project) brown. I hope she doesn't peek at my blog before she gets her package (she is supposed to get it this Friday). The pictures aren't the greatest...and you can't really see the detail of the item that I used (I can't mention what it is in case she does look at my blog...don't want to give her gifts away too much).


This is the lid...the tag like option in the (your) bottom left hand corner I left open so she could write in whatever it is that she was going to store in the box. I love labeling things so I know where I put stuff so I wanted to giver her that option as well. I'll be back tomorrow to show the card that I made for her. Thanks for stopping by.

Friday, July 22, 2011

Vacation, Vacation, Vacation....it has come and gone.

Until next year.....ok...so I might have some mini vacations between  now and then but now (what I like to call) real vacations for more than a year from now....sad face.

The above picture is my grandma....she is my world. I'm so happy that she is still able to travel with us and make it to these wonderful family vacation destinations. She is more able than most younger people I know. 


Some of the ladies lounging in the water....picture perfect. Can you tell where we are? Kind of looks like some of the carribean places that I have been but nope.....it's Florida. 


This little Octopus was adorable...well at least as adorable as an octopus can be right. He/She would not turn over though....so I got the legs from the back view. 


Sunsets are always amazing....


This was our home away from home. All in all I was pleased with the home. Just a few complaints. Wish there was a screened in portion of the porch...the bugs were bad at night. The AC didn't seem to be working right and when I called the owners that acted as if it was no big deal (set on 72 and it never got below 79 during the day...not right...right?).

I know this isn't that crafty...but I promise...I will be back soon with a card to share that I'm making for my shoebox sister on the cricut message boards. 

Monday, June 27, 2011

Sister's Shower was a hit


These babies were a huge hit. I always try to do things last minute so I ran out of time to make wrappers for every cupcake but I think it looks nice with just the cupcakes on the stand done with the wrappers and the table cupcakes in just plain wrappers. What do you think?

I couldn't help but post two pictures of the cupcakes, mainly because the first one was dark and you can't really see how bright these colors really are. The wrappers are made with the Life's A Party cartridge. I read up on these to figure out how to cut them. Lots of places you will find that you need to use the fit to length at 8 inches...I have a gypsy so I made them a width of 8 inches and arranged them to get the to get the most per 12x12 sheet of paper that I could (I was only able to fit four of these puppies on one sheet). I liked the decorations so much I saved the table cloths. Aside from liking them I also spent money on them so I try to save were I can for the next party.


Diaper cakes...I made one a long time ago and love making them. They are an easy decoration that the mommy to be can not only use to decorate the babies room with but also use the diapers when it comes time. The Zebra on top is actually a toy to hook on the babies stroller or car seat. My little cousin helped me get this together while I was busy getting the food in the serving dishes and out on the tables (I told you, I'm last minute...lol). 


Another helpful cousin decoration...she decided that the entrance needed to be indicated. I hosted the shower at a church and when you walk in the front door there are two directions that you could go...she wanted to make sure everyone came the correct direction (so sweet). 

I'm particularly proud of the color coordination of this event. Everything was black and white (zebra print) or hot pink and green. again, super proud of myself for this event. 

The gift table. You can't see it but there's lots of stuff under the table (in the floor). I guess I forgot to take a picture but we decorated a chair for the mommy to sit in...super cute we made a bow for the top and had little streamers coming off the bottom.

My little prego sister holding up two adorable hats. You know that cousin that I keep talking about that helped finish up some finally decorations.....well, she made these hats. My family is very creative. Well, at least I like to think we are. Aren't these hats adorable? 

One final decoration to talk about....the sign...not a great picture but it says LILYANA (the babies name). I used Hannah Montana rock star font. I love this font...my sister and I both love stars so I thought this would be cute, and she took it home to put in her room. 

Thanks for stopping by and checking out my sister's shower story. Hope to post something a little earlier next time. 


Friday, May 20, 2011

Mini can designs

I love the cricut community. The boards are an amazing place to meet amazing people who love their cricut and anything crafty. I was in a swap recently called mini mini mini paint can swap. Each person was paired up with a partner. The partners were to decorate a paint can and fill it with goodies for their partner. I've had this gal as a partner in two different swaps this one I knew she was my partner the other swap she was a secret. I didn't know she was designing for me.

Here's the one that I made...no comparison to what she made me. I love the colors and the design I just think she out did me. I had to lift the pictures she posted on message board of my can to her...in my rush to get it mailed out to her I forgot to take pics.


Now here's the one she made for me, this beautiful can was designed by Heart2hand (her message board name). She is so creative. She had made the stick pin and the flower you can see near the right side of this picture and the little black flower near the bottom left hand corner. 


The below darling little charm that was hanging from the paint can handle....she made it as well. I love it. I never really realized how much I love red. I knew I liked it and it was the color of my "girls" dresses in my wedding but she makes me love it. 

If you love what this amazing lady can do please visit her blog and check out all of the other amazing things that she does! Trust me...you'll love the inspiration that you get just by looking at some of the things that she does. I've never tried my hand at these handmade charms but you better believe after getting this one I'm going to get my feet wet and give it a try.

Wednesday, May 4, 2011

Graduation....long time coming

Graduation...oh my...what a wonderful accomplishment. I started college straight out of high school but after four years complete (five year degree was supposed to be the plan) I had to put my education on hold...life happened. I wanted to be a teacher for as long as I can remember. Science and Math....I was/am good with anything that has to do with numbers. A marriage and two children later I decided to go back to school but I had to change my major. Business, the next best thing I guess....I wouldn't be working with kids but I could certainly work with numbers. By completely changing my major I added an extra year and a half to my already completed four years. It took a time span of ten years (from start to finish....my first four years my break of four and a half years and then my final year and a half of school)...I'm proud. It took a long time but I never gave up on that part of my educational goal. 


They had bag pipes play us into the arena. When one thinks of bag pipes they don't really think..."oh how pretty" but it was...it sounded amazing. With the back drop meaning every work....YOU DID IT....yes, we finally did. This school was full of the non-traditional student. By that I meant we were no longer in our early twenties, most of us had a family and a full-time job to juggle with the stress of papers and finals....and we did it, despite the odds. 


I was trying to find my family up in the balcony area but these bright lights kept me from doing so. Little did I know I was looking right at them. In this picture I'm multitasking...I'm trying to shield my eyes from the light to find my family and hold my cap on. My "poofy" hair didn't want to let it stay on. At one point it did eventually fall off...ssssoooo glad it wasn't when I was walking across the stage.


I'm not in this picture...the hand(blur) in the bottom right hand corner is blocking where I would have been. I wanted to share this because I'm proud of all the people that graduated that day....even though I knew none of them...they deserved it, I know they worked just as hard as I did.


My mother-in-law was my photographer for the day...she captured this photo...I'm not sure what it is and I don't recall seeing it while I was there but I though it looked neat so I wanted to share. 


The stage...before we entered...trees in on the screen behind the chair. Trying to figure out what trees symbolize for the creator of this back drop. What are they supposed to mean to all the graduates that will be sitting in their seats waiting to cross this stage to receive their "diploma" (piece of paper telling you if you completed all your requirements and submitting the diploma application you would receive it in 6-8 weeks). 

Well...no creations today but I'll be back with more soon...I'm think scrapbook page for graduation...what do you think?


Saturday, April 30, 2011

Crusin' and loving the tropical destinations!

I've been going thru old photos trying to figure out how I would like to scrap them and I came across some photos from our 2nd Disney cruise. My husband and I took our first cruise in 2004 for our honeymoon and from that point fwd. we fell in love with crusin'. We wanted to share that joy with our son and any future children we had. Our son got to go on his very first cruise when he was just five years old and he loved every minute of it. I decide to make the layout simple so the pictures are the focal point. I used an oldie but goodie, it's a classic.. George and Basic Shapes. I got the inspiration from a layout I seen a long time ago, I just can't recall where I had seen it.

I do apologize for the picture quality, I couldn't get my camera to work so I used my phone. Typically it takes pretty good photos but it is making a liar out of me tonight. In these particular photos we were on Disney's Island called Castaway Cay and a few from the ships pool. The ship on the right hand page is a mock up of Pirates of the Caribbean and made the best photo spot. I'm big on double layouts and being able to include as many pictures as possible. I'm a picture fool. I love taking them, editing them and creating lasting memories. Most of the time I'm not in them due to always being on the "taking" end.


My son, he does so well in front of the camera or he did so well in front of the camera when he was younger. Now he is "too cool" to pose for mom and he never smiles when I want him to anymore. I don't recall what brand of paper I used as most of it is in stacks without the original packaging. I just love the bright blue and green togther and the patterned page makes the picture of my son pop.


Here's my family....the little dark haired boy is my life (my son) the tall guy next to him is my best friend (my husband). The blondie boy is my nephew, standing next to him is my sister and to the left of her my brother. I travel with my family....I love it, family is so important to me. I left the blue spot open for journaling...I have to dig thru the dust in my head to think back to that day. My advice....do not procrastinate in scrapbooking your memories. I have and I have trouble remembering sounds, sights, smells....you know all the stuff you want to remember and jot down in the journal box.

Well I do hope you enjoyed my cute but simple layout today. I will try to be back soon to post more.

Wednesday, April 20, 2011

No. 2 pick for my sister's baby shower


My sister couldn't just pick one type of invitation (I made three different samples) and she picked the onesie that I posted yesterday but she also thought the duck was adorable as well. So here is the second half of the invitations.


You can't see it very well but I took a vote on the duck's beak...should I just leave it matte black or should I glossy accent it up. I love that stuff! I had 4 voters and three of them like the glossy accent. They say it matches the eye. Below is an open view...again I will be printed on another paper to put inside with all the detailed information for the shower. This is a time that I could really use that imagine (I don't have one, sad face). I'm holding out for the anniversary addition that will have the capability to use both types of cartridges....I think that is going to be awesome! 


Again, I only used one cartridge for this invitation...New Arrival again. I used the gypsy to format the duck image into a "card". This one is a little bigger than the A2 size envelope so I have to go on the hunt for another type of envie for these guys.

Hope anyone reading enjoyed my post and I look fwd. to posting more often. I may not be able to post everyday but at least a few times a week. That is my goal for now. I would like to post everyday but I don't believe there are enough hours in the day with a full-time job, two children and a husband. LOL! The day should be longer, don't you think?

Tuesday, April 19, 2011

My sister is having a baby...

My sister is having a baby in July and being the great sister that I am I'm throwing the shower for her. I'm finally feeling better (months later) so I figure this is the perfect time to start creating. I can't just go and buy invitations so I had to make my own. I wanted to give her options so I made a couple samples. She has decided to do half and half....little cute girl onesies and a hot pink duck (I'll show this one later). I didn't want to make them too time consuming so this is what I came up with. I hope you enjoy.


I wanted to include a side view with the invitation open so you could get the idea of what it would look like to the reader. I'll be typing the location, date and all the other info on a peice of paper to put on the inside of the "card".

I only used one cartridge to make this invitation...New Arrival (oldie but goodie). I used my gypsy to alter the image and make it a card. I look fwd. to posting more often and sharing my creations with anyone who might be interested in looking.


Friday, February 18, 2011

Sick and Tired of being Sick and Tired

So I want to start this blog thing but I've been feeling yucky for several days now. Hopefully I will feel like myself again so I can start this blog.